From beginner-friendly projects to advanced statement pieces — everything you need to know to create beautiful, lasting wood art for your walls.
Wood wall art is one of the oldest, most enduring forms of home decoration — and right now, it is experiencing a renaissance.
As mass-produced prints and generic canvas art flood every home goods store, handmade wooden pieces stand apart. They carry texture, warmth, imperfection, and story. No two pieces of wood are identical, which means no two finished pieces will be either.
Whether you are a complete beginner picking up a craft for the first time, an intermediate maker with a few projects under your belt, or an experienced woodworker looking for fresh inspiration, this guide delivers 25 deeply explored project ideas.
For each one, you will find not just the concept, but the materials, the method, the skill requirement, common pitfalls, and professional tips that make the difference between a mediocre result and something you are genuinely proud to hang.
Wood & Material Foundations
Choosing the right wood is the single most important decision you will make for any wall art project.
The species, cut, and grade of wood determine not just how the piece looks, but how it behaves with tools, absorbs stain and finish, and holds up over years on a wall.
Many beginners skip this step and then wonder why their results look amateur. Professionals are obsessed with wood selection.
Best Wood Species for Wall Art — A Detailed Comparison
| Wood Species | Grain Character | Workability | Best For | Cost Level |
|---|---|---|---|---|
| Pine | Subtle, light grain with warm knots | Excellent — very easy to cut, carve, burn | Beginner projects, rustic/farmhouse styles | Low $ |
| Birch Plywood | Fine, consistent, smooth face | Excellent — cuts cleanly with minimal tear-out | Geometric designs, silhouettes, painting on wood | Low-Mid $ |
| Oak | Bold, open grain — very distinctive | Moderate — harder, needs sharp tools | Stained art, carved panels, heirloom pieces | Mid $$ |
| Walnut | Rich dark chocolate, swirling grain | Good — cuts beautifully, carves well | High-end focal pieces, natural finish art | High $$$ |
| Cedar | Aromatic, reddish-brown, tight grain | Easy — very soft, lightweight | Carved art, outdoor wall pieces, burned designs | Mid $$ |
| Poplar | Creamy white, minimal grain | Excellent — paints beautifully, easy to shape | Painted art, intricate scroll work | Low-Mid $ |
| Reclaimed Wood | Highly variable — aged character, checks, nail holes | Variable — often warped, dry, unpredictable | Rustic/industrial art, pallet projects | Free–Low $ |
| Maple (Hard) | Very fine grain, nearly white | Challenging — dense, dulls tools quickly | Precision inlay work, turned elements | High $$$ |
Understanding Wood Movement: Wood is a living material even after it is cut. It absorbs and releases moisture from the surrounding air, and as it does, it expands and contracts — primarily across the grain, not along it. This is critical for wall art design. Wide panels that fight wood movement will crack, warp, or split over time. Solutions include using floating panel frames (which allow movement), using plywood (which is dimensionally stable), applying finish to all sides equally, and keeping pieces away from high-humidity or rapid-temperature-change areas like above stoves or fireplaces.
Moisture Content: Wood for indoor art should be at approximately 6–8% moisture content. Wood purchased from big-box stores is often “construction dry” at around 12–19% and needs time to acclimate. Buy your wood several weeks early, store it flat in your home environment, and let it fully acclimate before working with it. Rushing this causes warping after the piece is finished.
Surface Grade: Lumber comes in grades. For wall art, you generally want “Select” or “No. 1 Common” — these have minimal knots and defects. However, for rustic-style art, knotty pine and “No. 2 Common” grade can provide beautiful character at a much lower price. Know which aesthetic you are targeting before you shop.
Essential Tools for Wood Wall Art
You do not need a fully equipped workshop to make stunning wood wall art. Many projects in this guide require nothing more than a handsaw, sandpaper, and a brush.
However, knowing what each tool does — and when you genuinely need it — helps you invest wisely and work safely.
Tool Reference: Starter to Advanced
Jigsaw The workhorse of wood art. Cuts curves, shapes, and internal cutouts. Essential for silhouettes and geometric designs. A quality blade makes all the difference — use fine-tooth blades (14–18 TPI) for clean cuts in thin wood.
Scroll Saw The fine-detail cousin of the jigsaw. Mounted on a table, both hands free, capable of incredibly intricate cuts. Used for fretwork, lettering, and lace-like patterns. A significant investment (~$200–600) worth it for serious crafters.
Wood Burning Pen (Pyrography Tool) A heated metal tip that scorches designs into wood. Available in beginner kits for under $30. Produces incredible detail and requires no cutting at all. One of the most accessible artistic tools in woodworking.
Router Creates channels, edges, and decorative profiles in wood. Used for inlay grooves, beveled edges, and carved patterns. Requires practice to use well. Plunge router + straight bit = versatile combo.
Orbital Sander Speeds up surface preparation dramatically. Use 80-grit for shaping, 120 for smoothing, 180 and 220 for pre-finish prep. Always finish the last pass by hand-sanding with the grain.
Drill + Bits Used for mounting holes, pilot holes before scroll saw cuts, dowel joinery, and Forstner bits for decorative circles. A cordless drill is essential even for the simplest projects.
Clamps You can never have too many. Essential for glue-ups and holding pieces during cutting. Spring clamps, bar clamps, and pipe clamps each serve different purposes.
Hand Carving Tools Chisels, gouges, and V-tools for relief carving. A basic set of 6–8 tools covers most projects. Keep them sharp — a dull carving tool is dangerous and produces poor results.
Beginner Projects — Ideas 1 through 8
01. Pallet Wood Shiplap Sign with Stenciled Quote

Beginner⏱ 2–4 Hours🔧 Handsaw, Sandpaper, Brush
Pallet wood signs are one of the most beginner-friendly and visually impactful projects in wood art. The rustic, imperfect texture of reclaimed pallet boards creates instant character without requiring any special artistic skill. A vinyl stencil (cut with a Cricut or bought online) allows you to apply crisp lettering or imagery that looks professional even on a first attempt.
Step-by-Step Method
- Source clean, dry pallet wood. Look for pallets marked HT (heat treated) rather than MB (methyl bromide treated). Sand each board to 120-grit, removing splinters but keeping character.
- Cut boards to equal lengths (24–36 inches works well for most walls) and lay them side by side. Attach two horizontal cleats across the back using wood glue and 1¼-inch screws to hold the boards together as a single panel.
- Apply a wood conditioner if the pallet wood is very dry and porous. This prevents uneven stain absorption.
- Stain or paint the front in your chosen color. Popular options: whitewash (white paint diluted 1:1 with water), dark walnut gel stain, or leave natural with a clear coat.
- Once fully dry (minimum 24 hours), apply your vinyl stencil. Press firmly along all edges with a credit card to prevent paint bleeding underneath.
- Apply two thin coats of contrasting paint through the stencil using a stencil brush or dense foam roller (do not brush — it bleeds under the stencil). Remove stencil while paint is still slightly tacky for cleanest edges.
- Finish with a clear matte or satin varnish for protection.
Pro Tip: Before applying your final stain color, try “distressing” the boards by beating them lightly with a chain or keys, drilling random worm holes, and dragging a wire brush along the grain. This fake aging looks remarkably authentic under stain.
02. Wood Slice Clock or Decorative Disc
Beginner⏱ 1–2 Hours🔧 Drill, Sandpaper, Clock Kit (optional)
A natural wood slice — a cross-section cut from a log — is one of the most striking raw materials in wood art. The concentric rings tell the story of the tree’s life, and no two are identical. These can be used as decorative wall hangings on their own, or fitted with a clock mechanism for a functional wall piece.
Step-by-Step Method
- Source your wood slices from a tree service, lumber yard, or online (Etsy sellers offer beautifully dried slices). Slices should be dried for at least 6–12 months to prevent cracking. If fresh, the bark may fall off — this is fine and often desirable.
- Sand progressively: 80-grit to smooth the faces, 120 to refine, 180 to finish. The goal is silky smooth flat faces while keeping the natural edge bark or rounded edge intact.
- Apply a penetrating oil finish (Danish oil or raw linseed oil) to seal and enrich the natural color. Wipe on, wait 15 minutes, wipe off excess. Repeat 2–3 coats over 48 hours.
- For a clock: drill a center hole slightly larger than the clock mechanism shaft (usually 5/16-inch). Insert the mechanism from the back, attach the hands to the front, and hang using the built-in hanger on the clock movement.
- For decorative art: simply add a sawtooth hanger or picture wire on the back and hang as-is, or add burned/painted elements to the face.
Pro Tip: Apply a thin coat of wood glue (slightly diluted with water) over the bark edge to prevent it from crumbling and peeling off over time. Let it penetrate and dry clear — it stabilizes the bark beautifully.
03. Geometric Wood Triangle Wall Arrangement
Beginner⏱ 3–5 Hours🔧 Miter Saw or Miter Box, Sandpaper, Glue
A gallery arrangement of geometric wooden shapes — triangles, hexagons, diamonds — creates a modern, architectural feel that photographs beautifully and adapts to any color scheme. The key is precision in your cuts and a thoughtful arrangement plan before any nails go into the wall.
Step-by-Step Method
- Choose your wood: 1×4 or 1×6 pine boards work well. Decide on a scale — small triangles (6–8 inch sides) for a dense arrangement, larger (12–16 inch) for bold statements.
- Cut pieces at 60° angles for equilateral triangles using a miter saw. A manual miter box works fine for beginners. Cut the three sides for each triangle separately — they will be assembled as open frames, not solid shapes.
- Sand all pieces to 150-grit. Finish some pieces dark, some light, some natural — the contrast between different finishes within the same arrangement is what makes it visually interesting.
- Assemble triangles using wood glue and small brad nails or finishing nails at each corner. Wipe away any excess glue immediately.
- On paper, sketch your arrangement to scale before committing to the wall. Tape paper templates to the wall with painter’s tape to visualize the final layout.
- Use a level for the first piece you hang, then work outward. Small sawtooth hangers on each triangle work well. Level spacing between each piece should be consistent.
Pro Tip: Mix solid wood triangles (stained or painted) with open-frame triangles in the same arrangement. The variation in visual weight creates depth and prevents the arrangement from feeling flat.
04. Wood Burned Botanical Map or Illustration
Beginner⏱ 4–8 Hours🔧 Pyrography Pen, Pencil, Smooth Wood Panel
Pyrography (wood burning) is one of the most creatively rewarding entry points into wood art. A controlled heated tip applied to a smooth wood surface creates rich, permanent marks that range from delicate sepia lines to deep, almost black shading. The learning curve is gentle, and results improve dramatically with even a few hours of practice.
Step-by-Step Method
- Choose the right wood. Basswood is the pyrography artist’s first choice — it burns evenly, has minimal grain interference, and is pale enough that the burned marks show maximum contrast. Birch plywood is an excellent affordable alternative.
- Sand the surface to 220-grit until perfectly smooth. Any grain texture will cause the burning tip to catch and skip, ruining fine lines.
- Transfer your design using graphite paper: print or draw your design, tape graphite paper face-down over the wood, place your design on top, and trace firmly with a ballpoint pen. The design transfers to the wood as a light pencil-tone guide you can burn over.
- Start your pyrography pen at a lower heat setting and practice on scrap wood first. Burn lighter areas by moving quickly; darker areas by moving slowly and using more pressure.
- Work in sections. Keep the pen tip clean by wiping it on a leather pad or fine sandpaper — carbon buildup makes tips skip and leave blotchy marks.
- After burning is complete, lightly sand the surface with 400-grit to remove any raised grain, then apply a clear finish (matte lacquer or spray varnish works beautifully).
Pro Tip: Burn in a well-ventilated space and away from children. The smoke from wood burning contains fine particulates — a small fan blowing the smoke away from your face, combined with a good mask, protects your lungs during longer sessions.
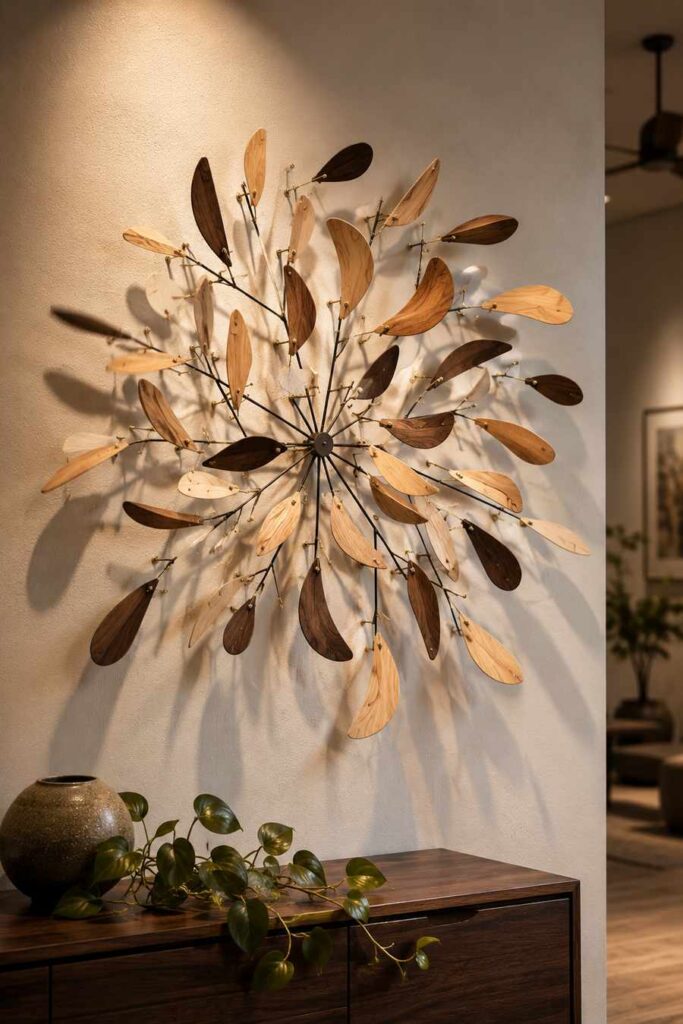
05. Driftwood or Branch Mobile Wall Hanging

Beginner⏱ 1–3 Hours🔧 Drill, Wire/Twine, Hook
Nature does most of the design work in a driftwood wall hanging. Beach-collected driftwood or interesting branches from a local forest provide sculptural, organic forms that no machine can replicate. These pieces work in coastal, bohemian, minimalist Scandinavian, and even industrial interiors — the style is in the arrangement and the added elements.
Step-by-Step Method
- Collect or source driftwood. Beach driftwood is already weathered and salt-treated naturally. Fresh branches should be dried for 2–4 weeks to prevent cracking and to kill any insects. Lay pieces flat and allow air to circulate around them.
- Clean the wood: scrub with a stiff brush, rinse if needed, and dry completely. For driftwood that feels soft or punky, apply a thin penetrating hardener product to stabilize it.
- Design your arrangement. The most common format: a horizontal branch as the main bar, with vertical elements hanging below — macramé knots, additional small branches, feathers, crystals, shells, or leather strips.
- Drill small holes at even intervals along the main branch for hanging elements. Use natural fiber twine (jute, cotton, or hemp) for hanging — the natural texture complements the wood perfectly.
- Tie elements using simple overhand knots or macramé square knots at varied lengths to create visual flow.
- Hang the complete piece from the wall with a single nail or hook through a loop of wire or twine attached to the branch ends.
Pro Tip: Soak collected driftwood in a solution of 1 cup bleach to 1 gallon of water for 15 minutes, then rinse and dry. This kills any remaining organisms and produces the beautiful pale, bone-white color that makes driftwood so distinctive.
06. Monogrammed Wooden Letter with Texture Fill
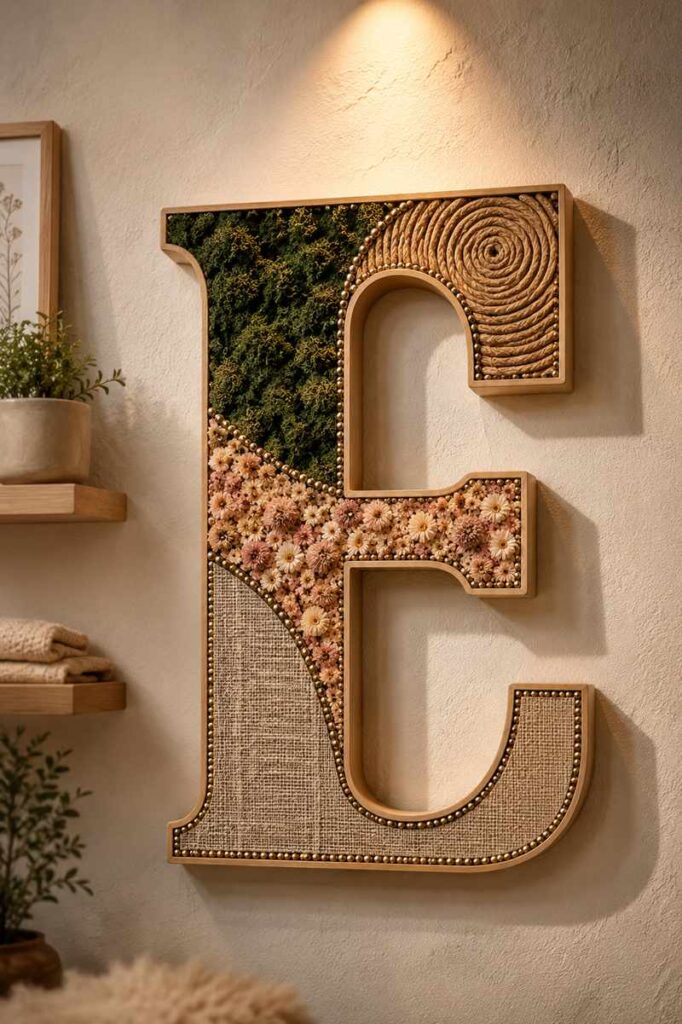
Beginner⏱ 2–4 Hours🔧 Jigsaw, Drill, Sandpaper, Embellishments
A large wooden letter — a family initial, a child’s first letter, or a meaningful number — makes a personalized focal point for any wall. The letter itself is cut from plywood or MDF using a simple printed template and a jigsaw; the magic comes in how the surface is finished and textured.
Step-by-Step Method
- Print a large letter at your desired scale using a projector or by tiling multiple pages. A clean, bold serif or sans-serif font at 12–18 inches tall reads best from a distance. Trace the outline onto ½-inch plywood or MDF.
- Drill a starter hole inside any enclosed areas (like the center of a P, B, or D) and cut the outline with a jigsaw. Take your time on curves — small, controlled movements produce smoother lines.
- Sand all edges, starting with 80-grit to shape and refine, finishing with 150-grit. Round over the sharp front edges slightly with sandpaper for a finished, professional look.
- Now choose your surface treatment. Options include: moss covered (glue preserved sheet moss over the face); covered with small flowers or fabric; painted in a bold solid color; covered in map paper, sheet music, or pages from a beloved book using decoupage; or filled with thin-sliced wood veneer pieces in a pattern.
- Seal the finished letter with a matte varnish spray. Add two D-rings on the back with screws for hanging.
Pro Tip: When covering a wooden letter with paper or fabric using decoupage, apply a base coat of Mod Podge to the wood first and let it dry. This seals the surface and prevents the dark wood from showing through lighter paper covers.
07. Rustic Wooden Frame with Moss or Air Plants
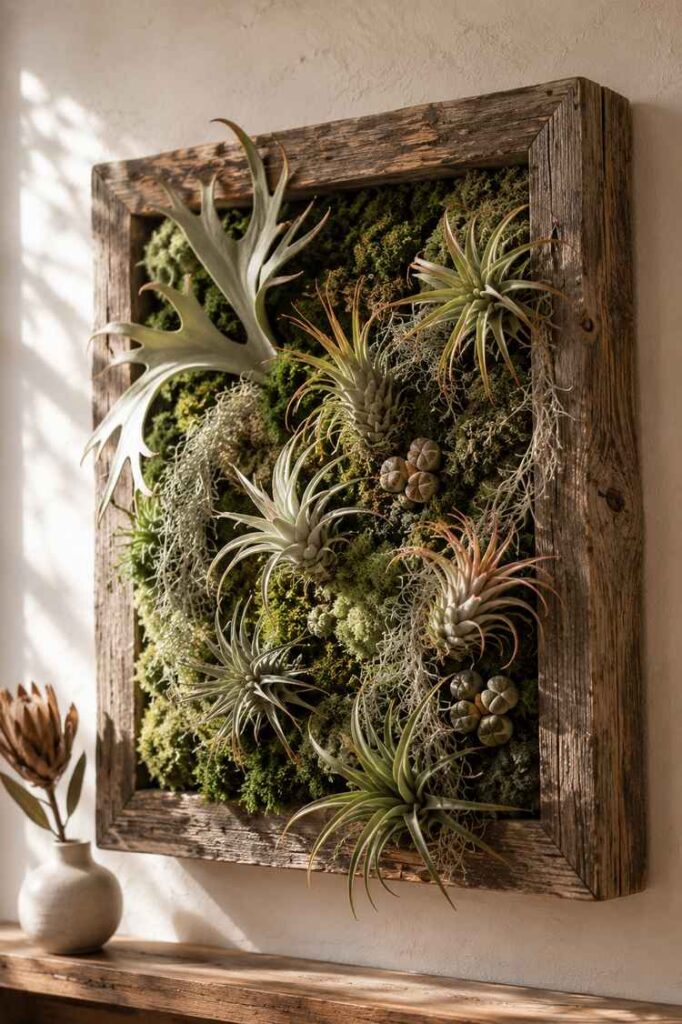
Beginner⏱ 2–3 Hours🔧 Miter Saw, Glue, Staple Gun
A living wall piece bridges the gap between art and nature. A simple wooden frame — rustic branches or finished lumber — holds preserved moss, air plants (tillandsias), or succulents that require no soil and minimal water. The result is organic, textural, and three-dimensional in a way that flat wall art cannot be.
Step-by-Step Method
- Build a shallow shadow-box frame from 1×3 or 1×4 lumber, mitered at 45° corners. Inside depth should be at least 1.5 inches to accommodate plant material. Size: 12×16 to 18×24 inches works well for most walls.
- Attach a plywood or hardboard back panel. This is where plants and moss will be anchored.
- Cover the back panel with preserved sheet moss as your base, attaching with a hot glue gun. Work quickly — hot glue sets in seconds. Press firmly and hold for a count of five per section.
- Add tillandsia air plants by nestling them into the moss and securing with a small dab of hot glue at the base (not the center). Air plants need no soil and only require misting once or twice a week.
- Add additional decorative elements: small pinecones, pebbles, bark pieces, or dried flowers for texture variation.
- Hang using two D-rings and picture wire, ensuring the frame is perfectly level so plants don’t shift.
Pro Tip: Use “preserved” moss rather than dried moss — preserved moss has been treated with glycerin and retains its soft texture and vivid green color for years without any watering at all. It looks alive but requires zero maintenance.
08. Painted Abstract Landscape on Reclaimed Wood
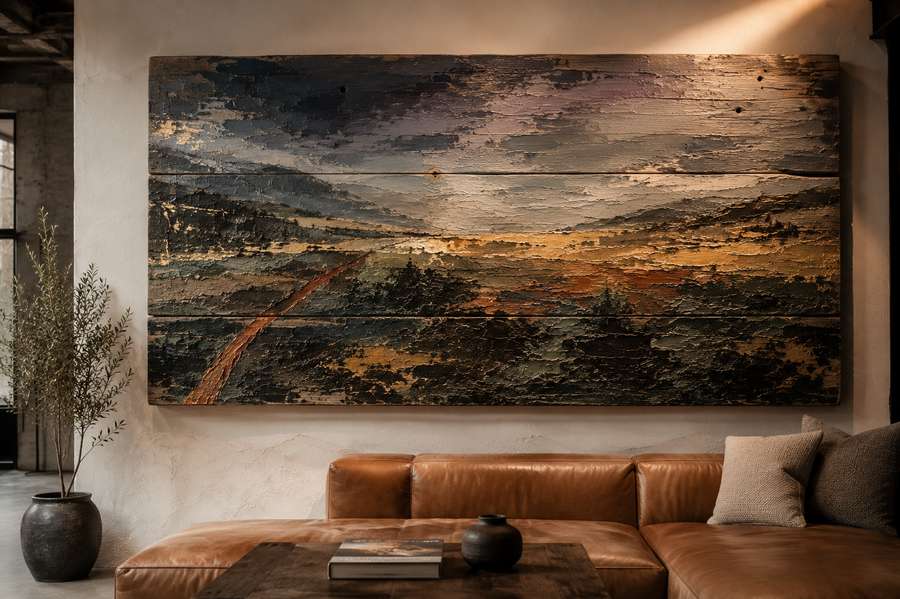
Beginner⏱ 3–6 Hours🔧 Brushes, Acrylic Paint, Sandpaper
Abstract landscape painting on wood is the perfect union of two artistic traditions. The wood grain itself contributes texture and visual movement that canvas cannot provide, and acrylic paint adheres beautifully to prepared wood surfaces. The “abstract” aspect liberates you from needing perfect technique — looseness and gestural brushwork are features, not flaws.
Step-by-Step Method
- Prepare a single reclaimed board or a small panel of glued-up planks. Sand smooth, seal the surface with a single coat of gesso or white acrylic paint — this prevents the wood from absorbing too much paint unevenly.
- Sketch your composition lightly in pencil. Simple horizon lines, mountain silhouettes, or sunset gradients are forgiving and striking on wood.
- Block in the largest shapes first using wide, flat brushes. Work from background to foreground. Thin your acrylic paint slightly with water for smoother blending.
- Build detail by layering — add tree lines, texture, and highlights after the base layers have dried (20–30 minutes for acrylic).
- Deliberately let the wood grain show through in some areas. This connection between painting and substrate is what makes wood panel paintings feel different from canvas work.
- Seal with a UV-resistant varnish — either matte, satin, or gloss depending on your preference. UV protection prevents color fading over years.
Pro Tip: Try a technique called “wash and wipe” for backgrounds: dilute paint heavily with water, brush it onto the wood, and immediately wipe partially away with a damp rag. The paint settles into the grain and produces a beautiful, layered color effect that looks completely different from solid paint.
Intermediate Projects — Ideas 9 through 17
09. Scroll Saw Fretwork Panel
Intermediate⏱ 6–12 Hours🔧 Scroll Saw, Drill for Entry Holes, Fine Sandpaper
Fretwork is the art of cutting intricate, lace-like patterns through thin wood panels. The negative space created by the cutouts is as important as the remaining wood. When backlit or mounted against a contrasting wall color, fretwork panels are breathtaking — detailed, delicate, and unmistakably handmade.
Step-by-Step Method
- Choose thin wood (1/8 to ¼-inch): birch plywood, basswood sheets, or Baltic birch work best. Too thick and the scroll saw struggles; too thin and the delicate sections break during cutting.
- Print or hand-draw your pattern. For beginners: start with geometric patterns (lattice, chevron, or honeycomb) before attempting organic or botanical designs. Attach the pattern to the wood with spray adhesive or transfer directly using graphite paper.
- Mark all “interior” sections to be removed. Drill a small pilot hole (1/16-inch) in the center of each interior section — this is where you thread the scroll saw blade to begin cutting from inside the pattern.
- Cut interior sections first, working from the center of the design outward. Then cut the outside profile last. This order keeps the wood stable while you work.
- Sand all cut edges with a folded piece of 150-grit sandpaper to remove any fuzz or tearout. A small sanding drum in a rotary tool is invaluable for reaching inside cutouts.
- Frame the fretwork panel in a simple shadow box frame, mounted slightly away from the backing to cast interesting shadows. Or hang directly on the wall as a standalone piece.
Pro Tip: Stack-cutting dramatically increases production speed: stack 2–3 layers of thin wood with the pattern on top, and tape all layers together with masking tape before cutting. Each pass of the blade cuts all layers simultaneously, producing perfectly identical pieces — great for gift sets or symmetrical arrangements.
10. Wood and Resin River Art Panel
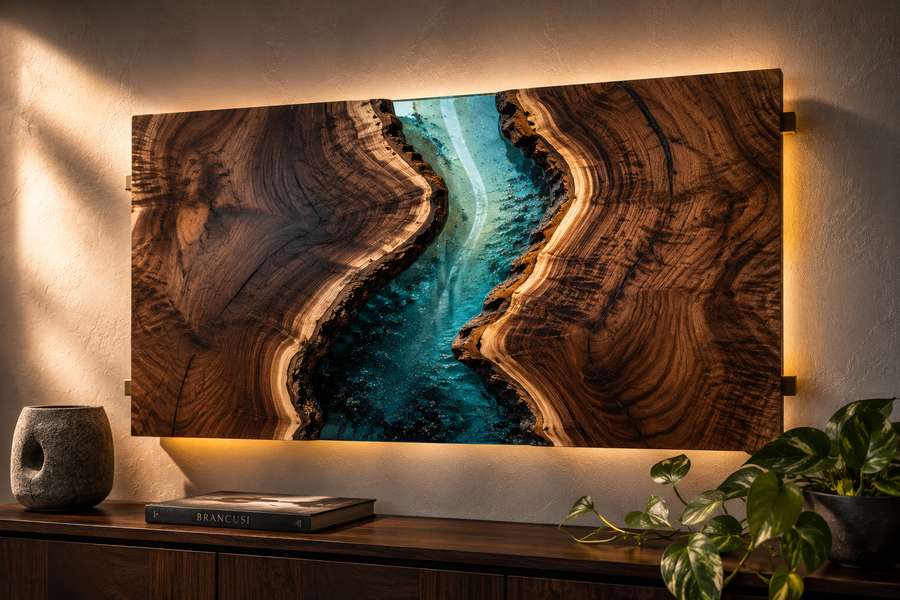
Intermediate⏱ 48–72 Hours (including cure time)🔧 Mixing Cups, Torch, Epoxy Resin, Wood Slabs
The “live edge river table” concept adapted for wall art is one of the most visually dramatic projects in this entire guide. Two pieces of live-edge wood — with their natural wavy edges facing inward — are mounted with a gap between them that is filled with tinted, poured epoxy resin. The result looks like a luminous river running through the wood.
Step-by-Step Method
- Source two pieces of live-edge lumber with interesting, complementary natural edges. Walnut, maple, or oak burl slabs produce the most spectacular results. The pieces don’t have to be identical — slight size variation adds natural character.
- Build a melamine-coated mold (a tray slightly larger than your finished panel). Mold release spray prevents resin from bonding to the mold. Seal all seams with silicone caulk — any gap and resin leaks out, making a colossal mess.
- Place wood slabs in the mold with the live edges facing the center gap. Secure to prevent floating when resin is poured. The gap width between the pieces becomes your “river” — 1.5 to 3 inches is a common choice.
- Mix epoxy resin and hardener exactly per manufacturer instructions (ratio matters enormously — incorrect ratios produce permanently sticky, uncured resin). Tint with mica powder or alcohol ink — blues and teals are the classic river color; turquoise is particularly popular.
- Pour in thin layers (¼ to ½ inch per pour) if making a thick panel. Each layer must be partially cured before adding the next, or mixing causes bubbles and thermal cracking. Allow 4–6 hours between pours.
- Use a propane torch or heat gun briefly over each pour to pop surface bubbles — move constantly and keep the flame moving to avoid scorching.
- After full cure (48–72 hours minimum), sand the surface flat starting at 80-grit, progressing through 120, 180, 320, 600, and finally 1000-grit wet sanding. Finish with a resin-specific polishing compound for a mirror shine.
Pro Tip: Work in a warm environment (70–75°F minimum). Resin cures much more slowly and with more bubbles in cold temperatures. Cover the curing piece with a cardboard box (not plastic wrap — that traps moisture) to protect it from dust while it hardens.
11. Layered Wood Topographic Map
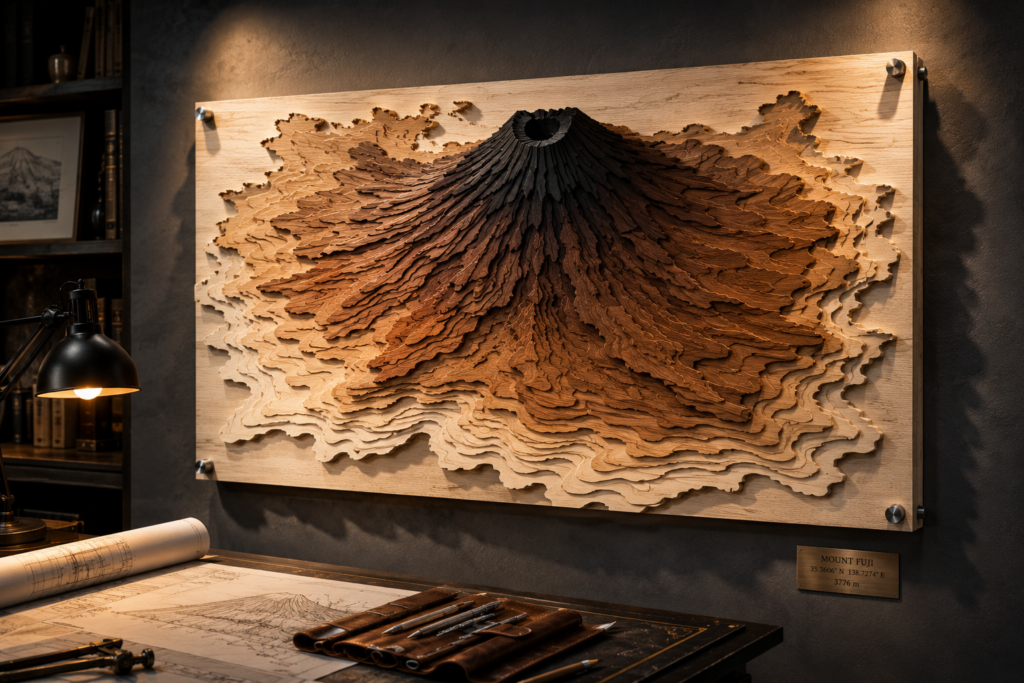
Intermediate⏱ 8–15 Hours🔧 Laser Cutter or CNC, or Scroll Saw, Wood Glue
A layered topographic map recreates the contour lines of a beloved mountain, coastline, or landscape in stacked layers of cut wood. Each layer represents a different elevation. The stacking creates genuine three-dimensional relief — the piece literally becomes the mountain it represents.
Step-by-Step Method
- Download topographic data for your chosen location from USGS (free) or use an online tool like TouchTerrain. Import the contour lines into design software (Inkscape, free) and separate each elevation band as its own cut layer.
- Cut each layer from ¼-inch birch plywood or MDF using a scroll saw, jigsaw, or — ideally — a laser cutter for precision. Label each layer on the back as you cut so they don’t get mixed up.
- Stack the layers temporarily to check alignment and visual coherence. Make any adjustments before gluing.
- Glue layers together from bottom to top using wood glue and clamps, allowing each bonded set to dry before adding the next layer. Let the full assembly cure for 24 hours.
- Sand the top surface and edges smooth. Apply stain, leaving each layer a slightly different shade to emphasize the separation, or paint each layer a different tone of the same color for a gradient effect.
- Mount in a floating frame that shows the edges and depth, or hang directly on the wall.
Pro Tip: For sentimental impact, choose a mountain where you proposed, a coastline where you honeymooned, or the topography of a hometown. The same technique applied to a meaningful landscape makes an unforgettable custom gift.
12. String Art on Wood — Geometric Portrait or Pattern
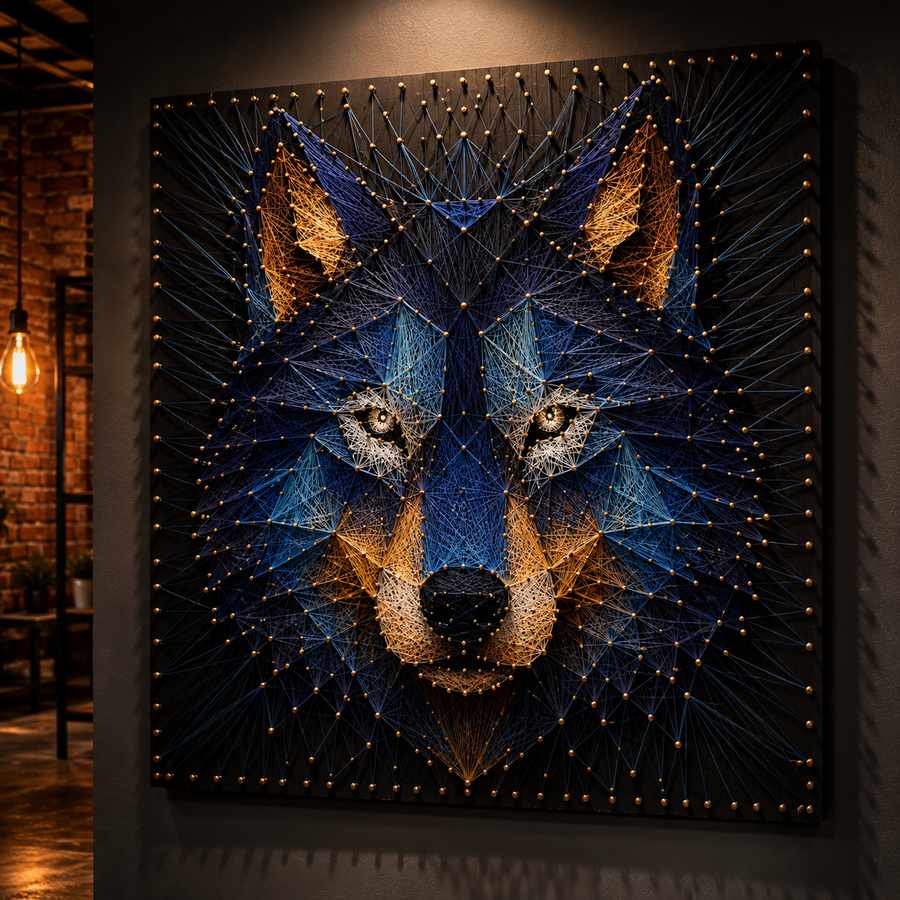
Intermediate⏱ 4–10 Hours🔧 Hammer, Small Nails, String/Thread, Wood Panel
String art uses nails hammered into a wood panel as anchor points, with colorful thread wrapped between them in patterns that create images or geometric designs through negative space and visual blending. The technique can be strikingly complex-looking while remaining approachable for anyone with patience.
Step-by-Step Method
- Choose a dark-stained or painted wood background for maximum contrast with light-colored thread. Black-stained MDF with white or metallic thread is a classic combination.
- Print your design to scale, tape it to the wood, and hammer nails (small finishing nails or wire nails, 1-inch length) through the paper at every marked point. Use consistent nail depth (approximately ½-inch protruding from the surface). Remove the paper template — the nail pattern remains.
- Begin wrapping thread. For portrait or image designs: the thread creates the image by the density of wrapping between nails — more thread between two nails = a lighter, more prominent area in the image. Study your reference image to plan where density should be highest.
- For geometric designs: simply wrap in defined patterns — star shapes, concentric curves, chevrons — all produced by the mathematical relationship between nail positions.
- Knot the beginning and end threads tightly against individual nails, dabbing the knot with a small amount of craft glue to prevent unraveling.
- Add multiple thread colors in layers for complex, vibrant results. Each color layer is wrapped separately.
Pro Tip: Pre-drill nail holes with a thin drill bit slightly smaller than the nail diameter. This prevents the wood from splitting on impact, and makes hammer work faster and more consistent — critical when placing 200–400 nails in a complex design.
13. Hand-Carved Relief Panel

Intermediate⏱ 10–20 Hours🔧 Carving Chisels, Gouges, Mallet, Basswood or Butternut
Relief carving is the ancient art of carving figures or designs into a flat panel so that shapes project forward from the background. Low-relief (bas-relief) carving — where the depth is minimal — is accessible for intermediate carvers and produces panels of extraordinary depth and personality. This is genuinely sculptural wall art.
Step-by-Step Method
- Choose a carving-friendly wood: basswood is the most forgiving and is ideal for first relief projects. Butternut carves beautifully and has a lovely warm grain. Avoid pine (resinous, grain causes tearout) and oak (too hard for fine detail carving).
- Transfer your design to the panel with graphite paper or pencil. Start with bold, simple designs: a leaf, a stylized animal, or a simple geometric medallion. Complexity can increase with experience.
- Outline your design with a V-tool, cutting along all major contour lines to a consistent depth of about 1/16-inch. This defines the edges of all raised elements.
- Lower the background areas using flat chisels and broad gouges. Aim for a consistent background depth of ¼ to ½ inch. Work across the grain with chisels for cleaner cuts without splitting.
- Model the raised foreground elements — round over edges of leaves, carve veins, add texture with riffler files or smaller gouges. This is where the piece gains dimension and personality.
- Lightly sand with 180-grit, hand-sanding only (power sanding destroys the carved texture). Apply a penetrating oil finish to bring out the grain and protect the surface.
Pro Tip: Sharpen your tools obsessively. A sharp carving tool cuts wood fibers cleanly; a dull tool tears and splits them, producing rough, uncontrolled cuts. A strop loaded with honing compound, used every 15–20 minutes of carving, keeps your edge keen enough to shave arm hair — that’s the standard to aim for.
14. Geometric Wood Mosaic (Parquetry Wall Art)
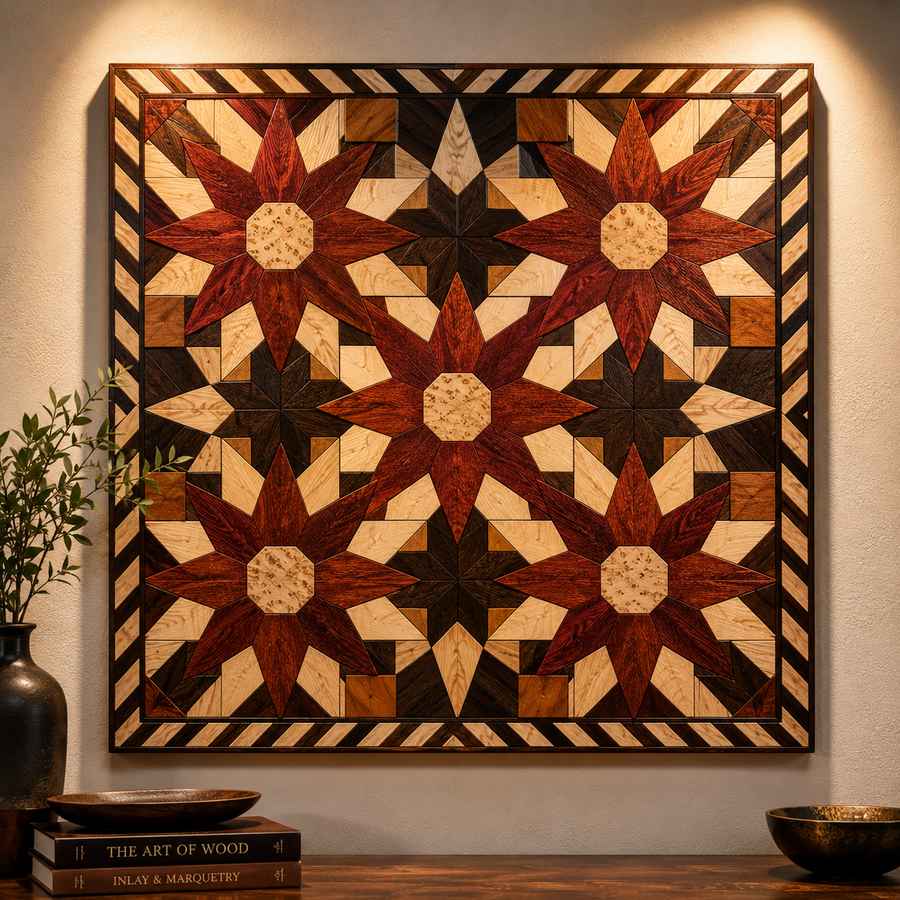
Intermediate⏱ 8–16 Hours🔧 Table Saw or Miter Saw, Multiple Wood Species, Glue
Parquetry is the art of assembling geometric shapes cut from different wood species into a unified pattern. Where inlay work creates patterns flush within a single panel, parquetry builds an entire surface from contrasting pieces. The natural color variation between wood species — pale maple, dark walnut, warm cherry, red padauk — makes painted color completely unnecessary.
Step-by-Step Method
- Design your geometric pattern on paper first. Classic patterns include herringbone, chevron, diamond/argyle, and the complex “tumbling blocks” 3D illusion. Simple patterns are most striking at this scale.
- Select 3–4 contrasting wood species. The stronger the natural color contrast between species, the more dramatic the finished piece. Pair: maple (white) + walnut (dark brown) + cherry (reddish-brown).
- Mill all woods to identical thickness (¾ inch is standard). Cut all pieces for your pattern using a sled on a table saw for consistent, precise angles. Small inaccuracies accumulate across many pieces.
- Lay out the dry-fit arrangement on a flat surface before applying any glue. Identify any alignment issues and correct cut angles before committing.
- Glue the assembly in sections: small sub-groups first, letting each cure, then assembling sub-groups into the full panel. Use a flat surface and clamps to keep the assembly level during curing.
- Once fully assembled and cured, run through a thickness planer or hand-plane to level the surface perfectly flat. Sand progressively through 80, 120, 180, 220 grit. Apply a clear finish that protects without obscuring the natural wood colors — Danish oil or a light polyurethane.
Pro Tip: Avoid mixing end-grain and long-grain pieces in the same panel if possible — they move differently with humidity changes and can cause the panel to develop cracks or raised edges over time. Keep all pieces oriented with grain running the same direction.
15. Macramé and Driftwood Woven Wall Hanging
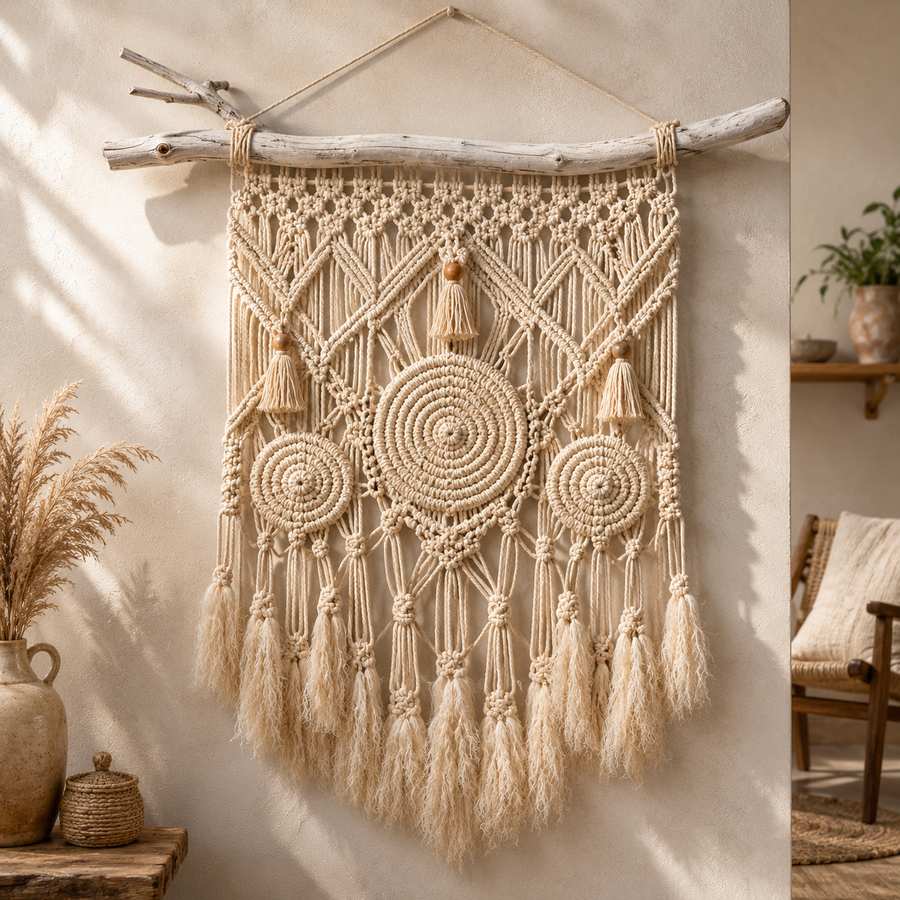
Intermediate⏱ 6–10 Hours🔧 Driftwood Branch, Cotton Macramé Cord, Scissors
The intersection of woodworking and textile art, a macramé wall hanging uses a natural wood branch as its structural foundation, with knotted cord hanging below in elaborate patterns. The piece is simultaneously rustic and refined, bohemian and elegant. The wood selection and how it is presented is as important as the knotwork itself.
Step-by-Step Method
- Source a driftwood or branch that is straight, 2–4 inches in diameter, and approximately 18–36 inches long (matching or slightly wider than your planned hanging width). Dry for several weeks and treat as described in Idea 5.
- Plan your hanging pattern on paper. Macramé wall hangings are typically widest at the top and taper toward the bottom. Core knots to learn: the lark’s head knot (attaches cord to the branch), the square knot (workhorse of macramé), and the spiral knot (creates a twisted column).
- Cut cord lengths — each working cord should be 4× the finished length of the hanging, because knotting uses a significant amount of cord. For a 24-inch hanging, cut cords 96–120 inches long.
- Attach cords to the branch with lark’s head knots, folded in half. Work in groups of 4 (producing 2 knots per group in a standard square knot).
- Work your pattern downward. Leave intentional open spaces between sections for visual breathing room — tight, dense knotwork is impressive technically but can read as busy when hung on a wall.
- At the bottom, comb out the remaining cord ends with a wide-tooth comb or stiff brush to create the characteristic fringe. Trim to a level, diagonal, or V-shape bottom edge.
Pro Tip: For a contemporary update to traditional macramé, incorporate thin strips of leather, feathers, wooden beads, and crystal points into the knotwork. These additions add texture, weight, and visual variety that transform a basic hanging into something genuinely distinctive.
16. Charred Cedar Wall Art (Shou Sugi Ban Style)
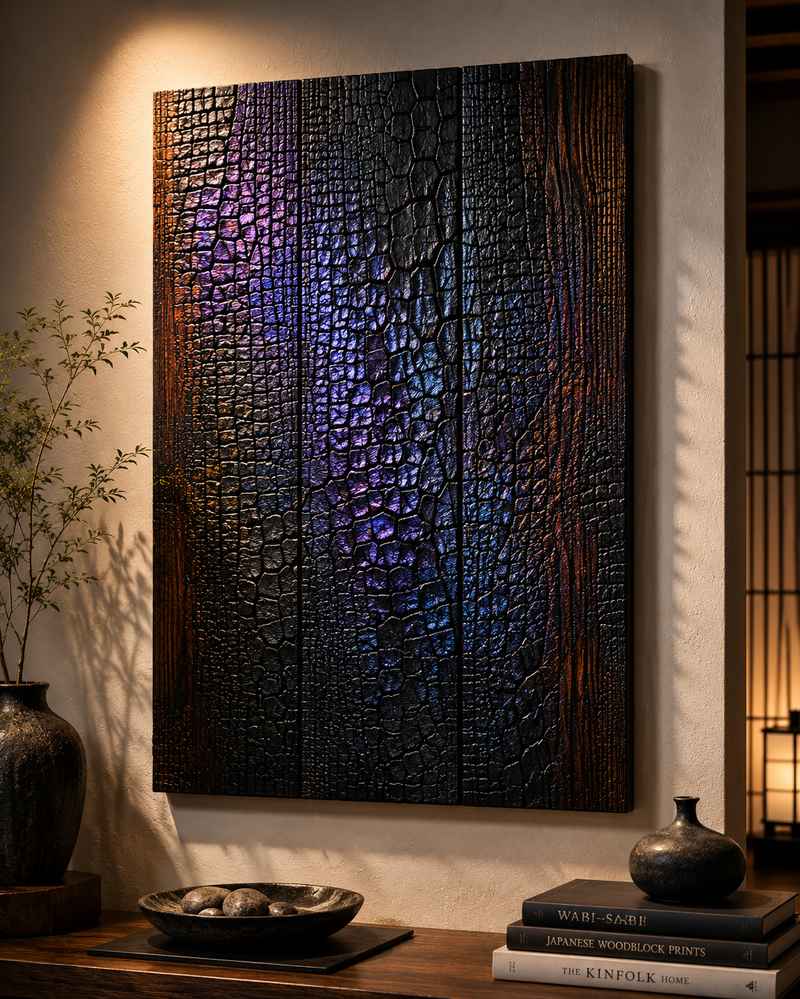
Intermediate⏱ 4–8 Hours🔧 Propane Torch, Stiff Brush, Outdoor-safe Finish
Shou Sugi Ban (Yakisugi) is a traditional Japanese wood preservation technique involving charring the surface of cedar with fire. The result is a dramatic, deeply textured surface of black char with beautiful iridescent colors — purples, blues, and silvers — hiding within. Adapted for wall art, it produces pieces of extraordinary character.
Step-by-Step Method
- Work outdoors with a fire extinguisher nearby. Use properly dried cedar boards or planks — the high resin content of cedar responds beautifully to the charring process.
- Using a propane or MAP gas torch, apply the flame to the wood surface in long, even passes. Work the torch at a consistent 2–4 inch distance, moving steadily to avoid charring unevenly or causing the wood to catch fire (which produces an uncontrolled, ugly char). The goal is a uniform, medium-depth char with the grain pattern visible through the black.
- For deeper, more textured charring (the classic “alligator scale” texture): apply more heat, allow the surface to char deeply, then use two boards to torch simultaneously facing each other — the heat convects between them and cracks the surface into scales. This is the most visually dramatic result.
- Once cooled, scrub the surface firmly with a stiff brush to remove loose carbon and reveal the iridescent char beneath. Wire brushing reveals more wood grain; soft brushing leaves more carbon and results in a flatter, blacker finish.
- Wipe off dust with a damp cloth. Apply a penetrating oil (tung oil or raw linseed) to stabilize and enrich the surface. The oil dramatically increases the visual depth and brings out iridescent colors.
- Arrange multiple treated boards as a panel with consistent or intentionally varied char depth between boards for visual interest.
Pro Tip: Experiment with applying a resist before charring: tape off geometric shapes or a stencil pattern with aluminum foil tape (regular masking tape burns off), torch the whole surface, then remove the tape. The protected areas remain natural wood color beneath the surrounding char — a stunning contrast.
17. Wood Veneer Marquetry Portrait or Pattern

Intermediate⏱ 10–20 Hours🔧 Marquetry Knife, Veneer Press or Clamps, Backing Panel
Marquetry is the art of cutting and assembling thin sheets of wood veneer into pictures or patterns — a tradition dating to Renaissance Europe, revived today as a contemporary fine craft. Each area of a design is cut from a different veneer species, selected for its natural color, and assembled into a complete composition. The results can be almost photographic in their detail.
Step-by-Step Method
- Begin with a simple design for your first project: bold, graphic shapes with minimal fine detail — a stylized leaf, simple bird silhouette, or geometric pattern. Complex scenes come later.
- Purchase wood veneer sheets in a variety of species. Many online suppliers sell sample packs. Key species and their natural colors: maple (cream/white), walnut (rich brown), purpleheart (vivid violet — no dye needed), ebony (near-black), yellowheart (bright yellow), padauk (vivid orange-red).
- Transfer your design to a piece of paper and plan which veneer species goes in which area. Tape your first veneer to the back of the drawing. Use a sharp marquetry knife or fine scroll saw blade to cut out the first piece exactly along the drawn line.
- Place this cut piece onto your second veneer, trace around it, and cut the second piece to fit exactly. Test the fit — it should be snug with no visible gap. This “trace and cut” method builds the puzzle piece by piece.
- Assemble all pieces face-down on a piece of veneer tape, taping all joints. This tape holds the assembled composition flat during glue-up.
- Glue the assembled veneer face-down (tape side up) onto a MDF or plywood substrate using contact cement or PVA glue, pressing flat under clamps or a veneer press for 24 hours. Remove tape with a damp sponge, sand lightly, and apply a clear finish.
Pro Tip: Keep veneers in airtight zip bags when not working — veneer is extremely thin and dries out quickly, becoming brittle and prone to splitting during cutting. A brief steaming with a damp cloth over an iron before cutting can restore pliability to dry veneer.
Advanced Projects — Ideas 18 through 25
18. CNC-Routed Bas Relief Portrait
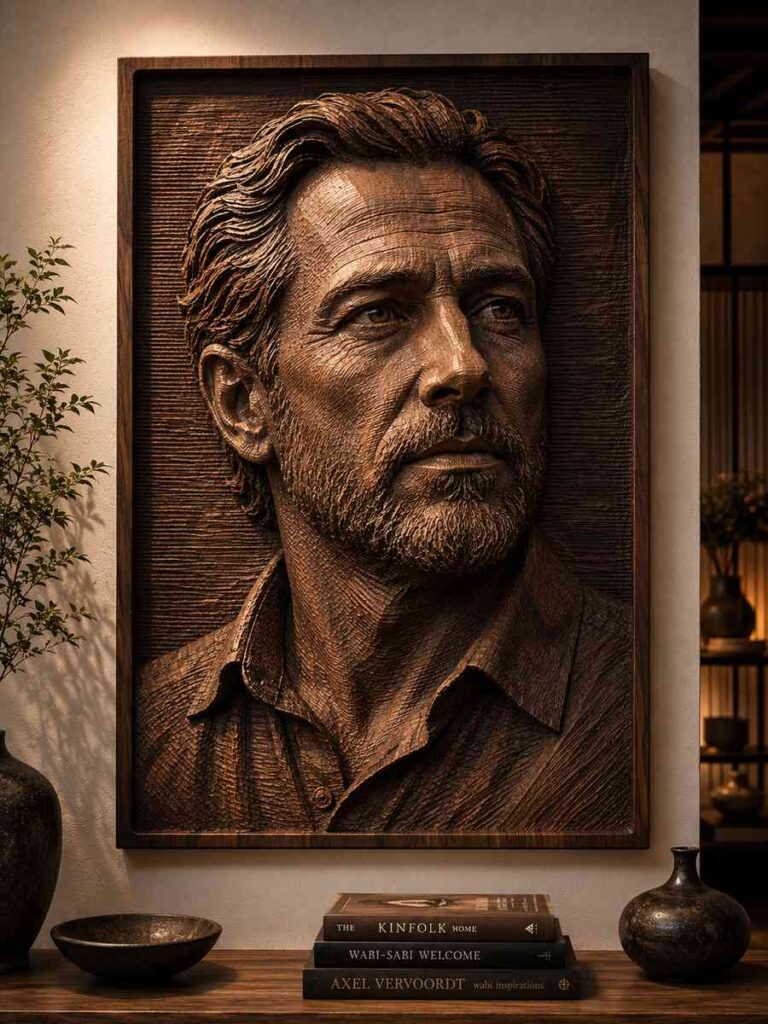
Advanced⏱ 15–30 Hours (including CNC time)🔧 CNC Router, CAD Software, Quality Lumber
A CNC router guided by a 3D model can carve a photographic-quality bas-relief portrait from a solid wood panel. The depth map of a photograph is translated into toolpath instructions that guide the router bit to carve higher where the face is light and deeper where it is dark, producing a sculptural recreation of a face or scene that is astonishing in its fidelity.
Step-by-Step Method
- Select a high-quality photograph with strong, directional lighting — this provides the tonal range that translates into depth variation. Black-and-white photos converted to grayscale depth maps work best.
- Use software such as Carveco, Aspire, or VCarve to convert the grayscale image into a 3D relief model. Adjust the relief height (typically 0.25–0.5 inch of maximum depth for a wall panel) and smooth any harsh transitions.
- Generate toolpaths: a roughing pass with a larger ball-nose bit removes the bulk of material quickly; a finishing pass with a small ball-nose bit (1/16 or 1/8 inch) adds fine detail. The finishing pass can take several hours on a detailed portrait.
- Choose a light-colored wood with consistent grain — basswood, maple, or poplar. Dramatic grain in the wood can obscure the portrait detail. Secure firmly to the CNC spoilboard with clamps or vacuum hold-down.
- Run the carving and monitor closely. After completion, hand-carve any fine details the CNC missed, and carefully sand to 220-grit using small sanding sticks in detailed areas.
- Apply a very thin wash of diluted dark stain over the completed carving, then immediately wipe off the high points. The stain collects in recessed areas and enhances the sense of depth and three-dimensionality dramatically.
Pro Tip: For maximum detail, run the finishing pass at 10% stepover (meaning the bit overlaps each previous path by 90% of its width). This dramatically increases carving time but produces a silky surface with almost no visible tooling marks.
19. Intarsia Wildlife or Nature Scene

Advanced⏱ 20–40 Hours🔧 Scroll Saw, Band Saw, Many Wood Species, Sandpaper
Intarsia is the three-dimensional cousin of marquetry. Where marquetry uses flat veneers, intarsia uses solid wood pieces of different thicknesses, shapes, and species, sanded and contoured so that each piece flows into the next like a jigsaw puzzle — but with elevation changes that create genuine sculptural relief. Masters of this craft create scenes so realistic they look painted from a distance.
Step-by-Step Method
- Select a pattern designed specifically for intarsia — commercial patterns include full-size templates, species suggestions, and cutting guides. Begin with a small, manageable subject: a single bird, a simple fish, a stylized flower.
- Transfer all pattern pieces to your chosen wood species. Species are selected for natural color match to the subject: a deer might use walnut for shadowed areas, maple for highlights, and cherry for the warm midtones.
- Cut all pieces with a scroll saw, cutting slightly outside the line. Label each piece on the back with its pattern number immediately.
- Fit and adjust each piece individually, sanding edges until each fits perfectly against its neighbors with no gaps. This fitting process takes most of the project’s total time — it is the heart of intarsia craft.
- Shape each piece for elevation and contour. Pieces at the “front” of the subject (a bird’s breast, an eye) should be higher than recessed background elements. Use a disc sander and hand sanding to establish smooth, flowing contours across each piece.
- Apply finish to each piece separately before final assembly — this ensures complete coverage in tight joints. Use a clear finish that highlights rather than covers the natural wood color.
- Glue all pieces to a thin backing of plywood, maintaining consistent elevation differences between pieces. Add a hanging wire or keyhole bracket to the back.
Pro Tip: Create a “dry fit” photo of your entire assembled piece before applying any glue. This reference photo is invaluable when positioning pieces during the glue-up phase — it’s surprisingly easy to accidentally flip or misplace a piece when working quickly under time pressure.
20. Live Edge Book-Matched Wall Panel
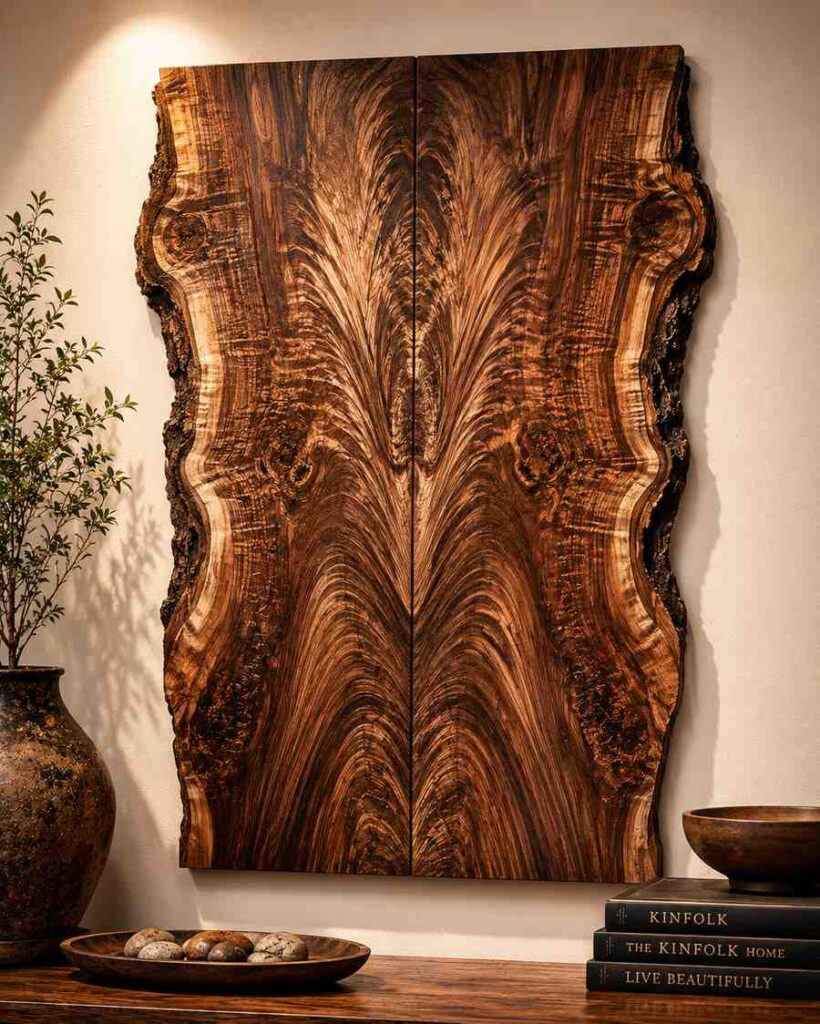
Advanced⏱ 12–24 Hours🔧 Hand Planes, Jointer, Finishing Supplies
Book-matching is the practice of opening two consecutive slabs cut from the same log like a book, so that their grain patterns mirror each other perfectly. The result is a symmetrical, butterfly wing pattern of grain that looks almost impossibly beautiful — as if the wood were designed by an artist rather than grown by a tree. As a wall panel, a book-matched pair requires no additional decoration.
Step-by-Step Method
- Source book-matched slab pairs from a specialty lumber dealer or sawmill. Walnut, maple burl, and cherry produce the most spectacular book-matched patterns. The slabs should be from the same log cut — ideally sequential slices.
- Flatten each slab using a hand plane, a router sled, or a wide drum sander. Getting two large slabs truly flat requires careful technique — take light, overlapping passes and check frequently with a straightedge.
- Join the mating edges so they come together without gaps. Achieving a perfect glue joint across the length of two live-edge slabs requires a hand plane and patience — this is where advanced woodworking skill genuinely matters.
- Glue the two slabs together at their joined edges, applying even clamping pressure along the full joint length. Let cure flat for 48 hours minimum.
- Flatten the glued panel again, sand progressively through the grits to 220, and apply a clear finish that allows the grain to speak — an oil-varnish blend or hard wax oil works beautifully.
- Mount the finished panel using a French cleat system (two interlocking beveled rails, one on the wall, one on the panel) for secure hanging that allows level adjustment.
Pro Tip: Consider deliberately leaving a thin gap (1/8-inch) between the two book-matched slabs rather than gluing them together. Fill the gap with black-tinted epoxy. This creates a bold visual “spine” that enhances the butterfly symmetry and solves the challenge of achieving a perfect wood-to-wood joint.
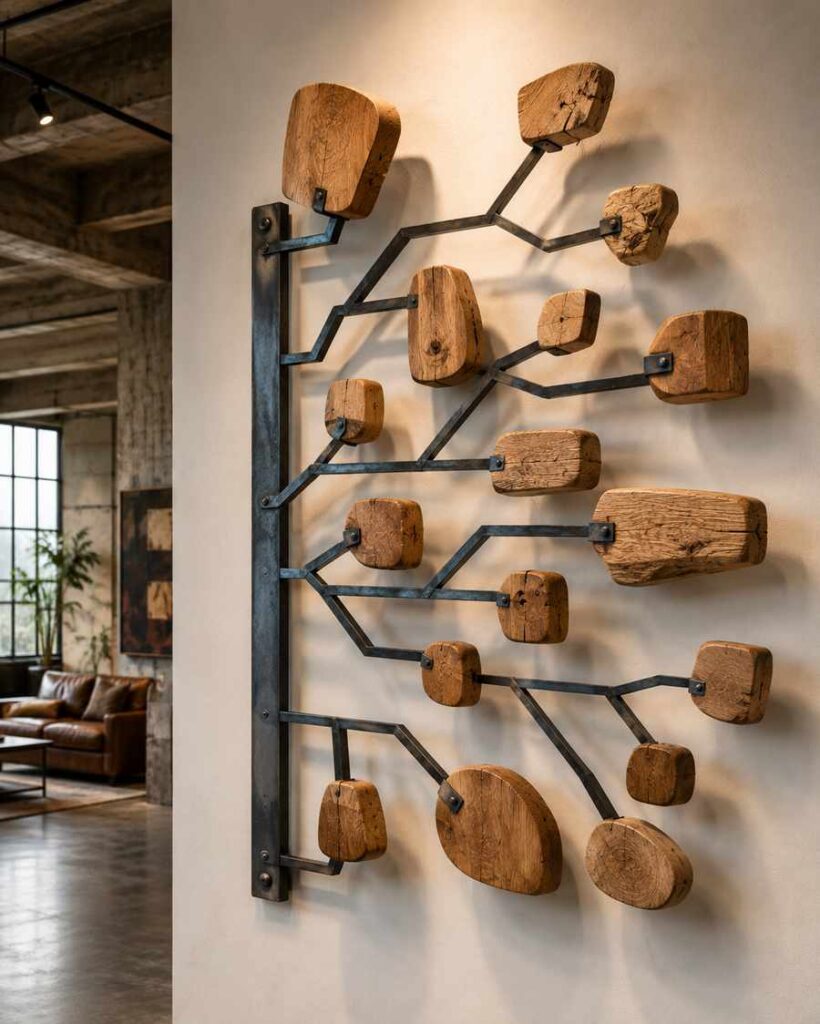
21. Wooden Kinetic Wall Sculpture
Advanced⏱ 15–25 Hours🔧 Scroll Saw, Drill, Pivot Hardware, Balance Testing
A kinetic sculpture moves. Wall-mounted kinetic wood art uses carefully balanced, pivoting elements that respond to air currents in a room — a breath, a passing person, a ceiling fan — to create constant, mesmerizing gentle motion. The engineering and aesthetic challenges of this project make it genuinely advanced, but the result is utterly unlike any conventional wall art.
Step-by-Step Method
- Design a system of nested or linked rotating elements. The simplest form: a series of wooden blades fanning out from a central hub, each attached with a pin or small bolt that allows free rotation. More complex: a mobile-like system of connected arms with elements at different distances and heights.
- Cut all elements with a scroll saw for smooth, symmetrical shapes. Leaves, fish, birds, abstract organic shapes, and geometric forms all work well. Each element must be symmetrical around its pivot point — or deliberately asymmetric to create spin when disturbed.
- Locate the precise center of balance for each element by placing it on a pin and adjusting until it hangs level. Mark this point and drill your pivot hole exactly here.
- Use small brass bolts or bamboo skewers as pivot pins, with washers to reduce friction. Elements should swing completely freely — even a tiny amount of friction prevents the delicate motion effect.
- Assemble and hang the sculpture. Adjust the balance of the entire system by adding tiny amounts of weight (drops of dried epoxy, small nuts) to elements that don’t hang correctly. This balancing process requires patience and iteration.
- Apply a light finish — heavy finishes add weight asymmetrically and affect balance. A wiped-on oil is ideal.
Pro Tip: Hang a kinetic sculpture near — but not directly under — an HVAC vent or in a hallway where air movement is naturally present. Even light air currents are sufficient to create beautiful, constant gentle motion. Avoid windows with direct sun, which causes uneven wood movement over time.
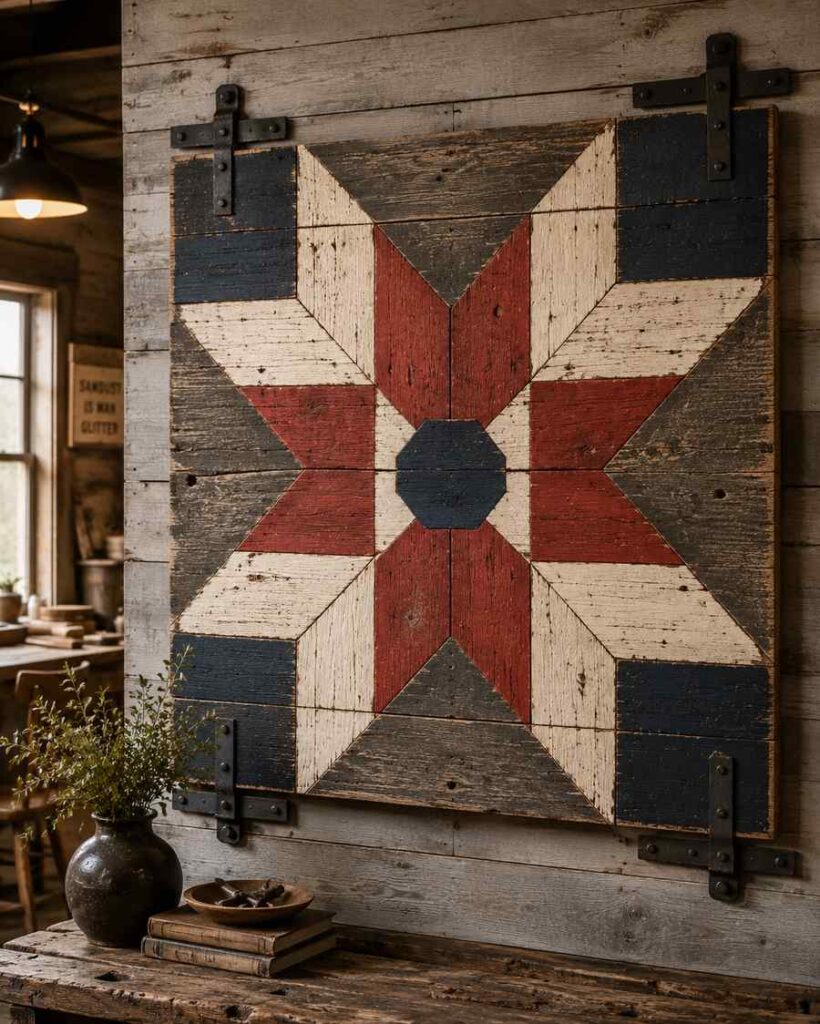
22. Reclaimed Timber Barn Quilt Panel
Advanced⏱ 12–20 Hours🔧 Table Saw, Planer, Clamps, Exterior Paint
Barn quilts are large-scale geometric patterns traditionally painted on barns in the American Midwest, inspired by quilt patterns. Modern interpretations use reclaimed lumber assembled into structural panels, with each geometric section painted or stained in contrasting colors. These pieces are designed for either indoor gallery walls or outdoor/covered porch walls.
Step-by-Step Method
- Select a traditional quilt pattern — Ohio Star, Bear Paw, Log Cabin, or Flying Geese are iconic choices with strong visual impact even at distance. Scale to your intended size: 24×24 inches for interior, 36×36 or 48×48 for exterior.
- Reclaim lumber from old barn boards, fencing, or pallet wood, or use rough-sawn pine for that textured look. Mill to consistent thickness on a planer (¾ inch is standard).
- Cut all sections precisely. A precise crosscut sled on a table saw is essential for accuracy — this is not a project where approximation works. Every degree off causes visible misalignment in the finished pattern.
- Glue and screw all pieces to a plywood backer, assembling the full pattern. Sand the face smooth to ensure even paint coverage.
- Apply your color scheme using exterior-grade paint for outdoor pieces or interior satin for indoor display. Use painter’s tape and a steady hand for crisp geometric edges. Two coats minimum; let each dry completely before taping for the next color.
- Apply a UV-resistant exterior sealant if outdoors, or a clear interior varnish inside. Add heavy-duty mounting hardware — these panels are substantial and require proper wall anchors.
Pro Tip: Instead of paint, achieve color variation through wood species and stain selection — the reclaimed, natural-finished version of a barn quilt has a warmth and subtlety that painted versions cannot match. Use dark walnut stain, natural pine, gray-washed reclaimed boards, and one section of deep red mahogany stain for a palette that is rich but entirely organic.
23. Wood and Metal Welded Wall Sculpture
Advanced⏱ 15–30 Hours🔧 Welder, Angle Grinder, Wood, Steel or Copper
Combining hand-finished wood elements with fabricated metal in a single wall sculpture creates a visual dialogue between organic and industrial, warm and cold, natural and man-made. The contrast is inherently interesting. This requires either welding skill or a collaborative arrangement with a metal fabricator — but the design and wood work can be led entirely by the woodworker.
Step-by-Step Method
- Design the composition as a sketch showing how wood and metal elements relate. Common approaches: steel or copper tubes/pipes forming a geometric armature with wood panels inset; wood slabs with metal letters or symbols welded to their faces; or metal structural frames that hold irregularly shaped wood “windows.”
- Work the metal and wood elements separately. Finish and sand all wood components first — it’s much easier to do this before they’re permanently combined with metal.
- For steel elements, use an angle grinder to create a brushed finish, or chemically patina the steel with vinegar and salt for a warm rust-and-brown tonal range that complements dark wood beautifully. Seal the patina with a clear lacquer to stabilize it.
- For copper elements, raw copper weathers to verdigris green over time or can be chemically aged with salt and ammonia vapor. Sealing preserves whichever stage of patina you prefer.
- Join wood to metal using appropriate fasteners — bolts with decorative heads, or mechanical connections that make the joining detail itself a visual feature.
- Mount the combined sculpture using heavy-duty French cleats or multiple anchor points — these pieces can be heavy, and the weight distribution of combined materials requires careful engineering.
Pro Tip: Use a thin spacer (washers or a rubber gasket) between any metal that contacts wood. Direct metal-to-wood contact can cause tannin staining (especially with oak), and it traps moisture that accelerates corrosion of the metal and rot in the wood. A tiny gap preserves both materials.
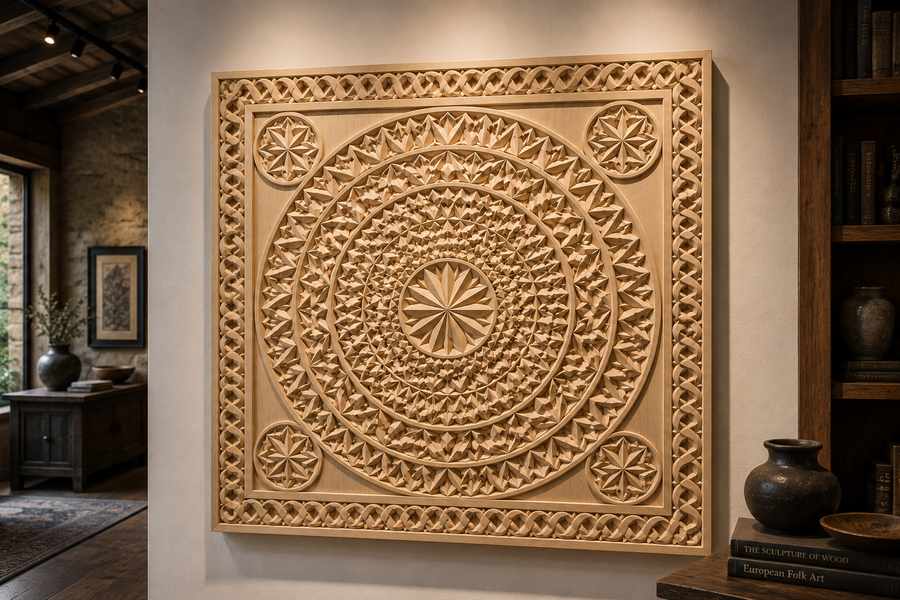
24. Chip-Carved Geometric Medallion Panel
Advanced⏱ 15–25 Hours🔧 Chip Carving Knife, Basswood Panel, Geometric Compass
Chip carving is one of the oldest decorative woodworking traditions in the world — practiced across Central Europe, Scandinavia, Russia, and indigenous North American cultures for centuries. Using only a specialized knife (or two), the carver removes small “chips” of wood in precise triangular cuts to build up complex geometric rosettes, borders, and medallions of extraordinary precision and beauty.
Step-by-Step Method
- Use proper chip carving wood: basswood, butternut, or white pine. The wood must be completely clear of knots and have perfectly consistent grain. Surface to 220-grit before drawing any design.
- Layout your design using a geometric compass, ruler, and pencil. Chip carving designs are mathematically constructed — they rely on precise divisions of circles and straight lines. A 6-pointed or 12-pointed rosette is a classic starting medallion.
- Study the two fundamental cuts: the stab cut (straight down into the wood at a precise angle) and the slice cut (drawn toward you at an angle). Each triangular chip requires three cuts — two stab cuts to define the chip’s outer edges and one slicing cut to release the chip. Executed correctly, the chip pops out cleanly leaving a perfect V-groove.
- Work systematically from the center of the design outward. Keep your knife absolutely sharp — chip carving is entirely about precision cuts, and a dull knife causes crushing rather than cutting.
- The finished surface can be left natural (showing the clean white wood in the cuts against the slightly weathered surface), or a stain can be rubbed in and immediately wiped off — the stain catches in the cuts and dramatically increases visual contrast and pattern visibility.
- Apply a thin coat of oil or satin lacquer to protect the surface.
Pro Tip: Practice each chip type extensively on scrap basswood before committing to your panel. Chip carving requires a specific wrist motion that takes time to develop. The first 50–100 chips you carve will be imperfect — that’s normal and necessary. Expertise in this craft comes faster than most people expect.
25. Full-Scale Carved and Gilded Wood Panel
Advanced⏱ 30–60+ Hours🔧 Full Carving Set, Gold Leaf, Gilder’s Tip, Burnishing Tool
The summit of decorative wood wall art: a fully hand-carved relief panel with gilded accents. This technique, used in European decorative arts for centuries, combines sculptural carving with the application of real gold leaf — a material so thin it floats on air — to selected areas of the composition. The result has an ageless quality that no other technique can approach.
Step-by-Step Method
- Plan a composition that has distinct carved areas and areas that will receive gilding. Traditional approaches: carved foliage and floral elements with gilded veins and highlights; a carved frame with gilded molding profiles; or a figurative scene with gilded halos, rays, or architectural elements.
- Execute the carving following all techniques described in Idea 13, taking this composition to a higher level of detail and polish. Sand all carved surfaces with folded sandpaper, reaching inside every groove.
- For the gilding: apply multiple coats of gesso (traditionally rabbit skin glue-based, though modern acrylic gesso works) to the areas to be gilded. Sand smooth between coats — the gilded surface is a perfect mirror that reveals every flaw underneath.
- Apply an oil-based or water-based size (gilding adhesive) to the gessoed areas. Wait until the size reaches the correct “tack” — when it feels like a sticky label, typically 20 minutes to several hours depending on product.
- Lift individual sheets of gold leaf (23.5 karat genuine gold is traditional; composition/imitation gold works for practice) with a gilder’s tip brush (statically charged by drawing across your hair or cheek) and gently float them onto the tacky surface. They adhere immediately on contact.
- After all gold is applied and dried, burnish the surface with an agate burnisher in firm, circular strokes. This compresses the gold leaf, increasing its brilliance and depth dramatically. Apply a light protective varnish formulated for use over gold leaf to prevent tarnishing.
Pro Tip: For an antique appearance, deliberately break the gold leaf surface in random areas by allowing the gold to bridge imperfections in the size application, or by lightly burnishing with a stiff brush. This creates the “distressed gilt” look of antique frames — more beautiful and characterful than perfectly even gilding.
“Wood is the only material that becomes more beautiful with age, more interesting with imperfection, and more personal with each maker’s touch.”A truth every wood artist discovers
Finishing & Sealing Guide
The finishing stage is where most handmade wood art projects either succeed beautifully or fall short. The right finish does three things: it protects the wood from moisture, UV light, and physical damage; it enhances the natural beauty of the grain and color; and it sets the visual tone of the piece — matte, satin, or gloss finishes create dramatically different aesthetics on the same underlying wood.
🛢️ Penetrating Oils
Danish oil, tung oil, linseed oil. Soak into the wood rather than forming a film. Bring out rich, natural color. Easy to apply and repair. Best for natural-look pieces where you want to feel the wood rather than a coating.
🪣 Polyurethane
Water or oil-based film finish. Excellent durability and moisture resistance. Available in matte through high-gloss sheens. Oil-based yellows slightly (which can enhance warm wood tones). Best for functional pieces or high-traffic displays.
🌿 Hard Wax Oil
A hybrid: penetrates like an oil but leaves a thin protective wax film. Excellent for contemporary Scandinavian aesthetics. Easy to maintain — damaged areas can be spot-repaired without refinishing the whole piece.
💨 Lacquer
Sprayed on, dries quickly (15–30 min), builds in thin coats. Available in all sheens. Professional-looking results but requires spray equipment and good ventilation. Ideal for large, flat panels where brush marks would show.
🎨 Shellac
Natural product (secreted by lac bugs). Beautiful warm amber tones. Easy to apply and repair. Dissolves in denatured alcohol — not suitable for areas with water or alcohol exposure. Excellent as a sealer coat under other finishes.
🖌️ Milk Paint + Top Coat
Historically inspired, ultra-matte, flat finish. Creates beautiful aged patina effects. Must be sealed over with oil or varnish. Perfect for rustic and farmhouse style projects where a weathered, chalky look is desired.
Application Best Practices: Always sand to at least 180-grit (220 for fine work) before finishing. Remove all sanding dust with a vacuum, then a tack cloth. Apply finishes in thin, even coats — thick coats cause drips, bubbles, and uneven curing. Sand lightly between coats with 320-grit to remove dust nibs, then wipe clean before the next coat. Three thin coats outperform one thick coat every time.
End Grain Sealing: End grain (the cross-section of wood fibers, visible at cut ends) absorbs finish dramatically faster than long grain, often resulting in dark, blotchy end grain that looks unfinished. Seal end grain first with a diluted coat of your chosen finish (10–15% thinned), let fully dry, then apply subsequent coats normally. This pre-sealing prevents uneven absorption.
Hanging & Display Tips
A beautifully made piece hung incorrectly — crooked, with visible hardware, or insecurely fastened — diminishes everything that went into making it. Hanging is part of the craft. Here is what professionals know about displaying wood wall art.
- French Cleats are the gold standard for heavy wall art. Two interlocking 45° beveled rails — one mounted to the wall, one attached to the piece — distribute weight evenly along the entire width and allow easy horizontal adjustment after hanging. Use for any piece over 10 lbs.
- Keyhole Brackets are recessed metal slots routed into the back of the piece. A screw head in the wall slots into the wide end and slides to lock into the narrow end. Completely hidden when hung. Best for medium-weight pieces (5–20 lbs).
- D-Rings and Picture Wire suit lighter traditional pieces. Use two D-rings positioned at ⅓ of the height from the top for stability. Always use wire with a weight rating 3× the piece’s actual weight. Level hanging requires measuring equal distances from the top edge to each ring.
- Floating Standoffs mount the piece ¾ to 1 inch from the wall, creating a drop shadow that adds visual depth and a contemporary gallery feel. Used on minimalist or mid-century modern designs.
- Find Wall Studs for any piece over 5 lbs. A quality stud finder costs under $20. Drywall anchors have limited holding strength; a screw into a stud handles 10× the load of an anchor in drywall alone. Never trust drywall alone for heavy wooden art.
- Use a Level — always. A piece hung 2° crooked looks incorrect even to viewers who cannot identify why. Measure from multiple points and use a long spirit level for wide pieces.
- Anti-slip pads (small rubber bumper feet) on the lower back corners of wall art prevent pieces from swinging away from the wall and protect the wall surface from scratching.
Frequently Asked Questions
What is the best wood for a beginner starting wood wall art?
Basswood and birch plywood are the best starting materials. Basswood is ideal for carving and pyrography — it cuts cleanly and burns evenly. Birch plywood is dimensionally stable, flat, smooth, and takes paint, stain, and scroll saw cuts beautifully. Both are inexpensive and widely available at craft stores and lumber yards. Avoid MDF for painted projects (it’s great) but do not use MDF for staining or natural-finish projects — it has no grain and absorbs stain blotchily.
How do I prevent wood from cracking after I make a piece?
Cracking is caused by rapid moisture change. Prevent it by: acclimating wood fully to your home’s humidity before working; applying finish to all six sides of the piece (not just the face) to equalize moisture exchange; using plywood or MDF for large flat panels instead of solid wood boards; and designing for wood movement in solid-wood pieces by using floating panels, breadboard ends, or strategic joinery that allows expansion and contraction without stress buildup.
Can I use pallet wood for wall art? Is it safe?
Yes, with one critical caveat: only use pallets stamped “HT” (heat treated). Pallets stamped “MB” (methyl bromide) have been treated with a toxic pesticide and should never be used for art or any indoor application. Heat-treated pallets are entirely safe. Inspect pallet wood carefully — remove any nails completely (even broken shafts), sand thoroughly, and consider a light application of wood stabilizer if the wood seems punky or soft.
How do I get a professional-looking smooth finish on painted wood art?
Three things make painted wood look professional: surface preparation (sand to 180-grit, apply wood conditioner, then a thin coat of primer — let each dry and sand between coats with 220-grit); thin coats (multiple thin coats of paint cure flatter and harder than one thick coat); and final sanding between coats (a light pass with 320 or 400 grit between coats removes dust nibs and gives subsequent coats something to grip). For the smoothest possible finish, apply the final coat, let cure 48 hours, then wet-sand with 600-grit and polish with a furniture polish or finishing wax.
What tools do I absolutely need to get started?
You can start making beautiful wood wall art with surprisingly little: a decent set of sandpapers (80, 120, 220 grit), a wood burning pen (~$25), basswood panels or birch plywood, and basic brushes and finishes. This kit produces excellent pyrography and painted pieces. Add a jigsaw (~$60–120) and you open geometric and silhouette cutting. Add a scroll saw (~$200+) and intermediate fretwork and detail cutting becomes possible. Buy tools as your projects demand them rather than all at once.
How do I hang a heavy piece of wood art on the wall?
For any piece over 5–7 lbs, locate wall studs with a stud finder and use screws directly into the studs. A French cleat system (described in Section 7) is the most professional solution for large, heavy pieces — it distributes weight evenly, is virtually invisible when hung, and allows precise level adjustment. For walls where studs aren’t accessible, use heavy-duty toggle anchors rated for the weight of the piece with a significant safety margin.
How do I price handmade wood wall art if I want to sell it?
A common formula: (Material cost × 3) + (Hours × your hourly rate). The material markup covers overhead, waste, and shipping supplies. Your hourly rate should reflect your skill level — beginner makers often start at $15–20/hour; experienced craftspeople charge $40–100+. Research comparable handmade pieces on Etsy and at local markets. Understand that pricing “for the materials only” undervalues your skill and time and is economically unsustainable long-term. Buyers who genuinely appreciate handmade work understand that it commands a premium.
Now Go Make Something
The most important step in any craft is the first one. Pick the project that excites you most, gather your materials, and begin. Every master woodworker started with a simple piece and gradually pushed further. The 25 ideas in this guide span a lifetime of making — but it all starts today.